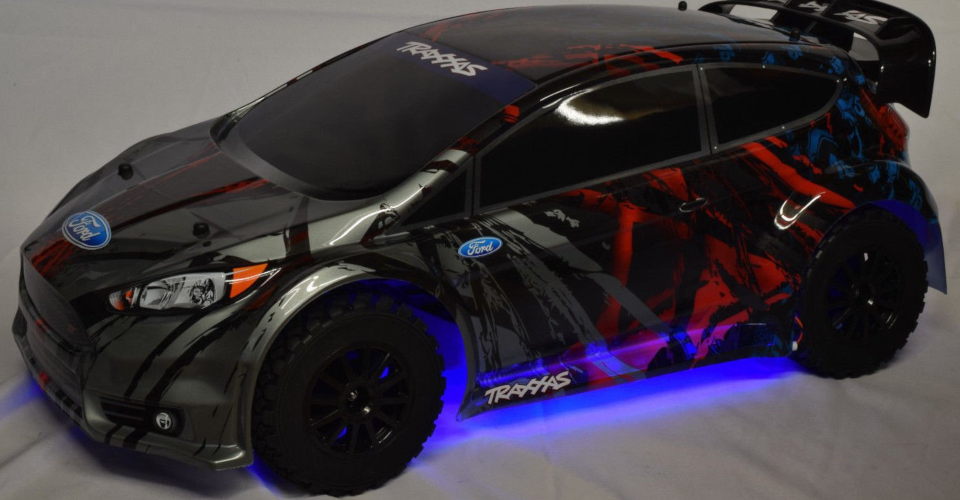
Ever felt your RC car was missing that certainsomething? That it just blended in with the crowd, even when tearing up the track? Imagine transforming your ordinary remote-controlled vehicle into a head-turning, light-blazing machine that commands attention. It's not as difficult as you might think!
Let's be honest, RC cars are awesome, but sometimes they lack that personal touch. You want to stand out, to showcase your unique style. Maybe you've seen those incredible videos online of RC cars with glowing underbodies and flashing headlights, and wondered, "How can I do that?" The electronics can seem intimidating, the wiring daunting, and the fear of frying your expensive RC car is definitely real.
This guide is your roadmap to adding stunning LED lighting to your RC car, even if you're a complete beginner. We'll break down the process into easy-to-understand steps, covering everything from choosing the right LEDs to safely wiring them into your car's electrical system. Get ready to unleash your creativity and transform your RC car into a rolling masterpiece!
Adding LED lights to your RC car doesn't have to be complicated. We'll cover the essential components, wiring techniques, and safety precautions, giving you the knowledge and confidence to create a truly unique and eye-catching RC car. We'll discuss LED types, resistors, power sources, and installation methods, empowering you to customize your ride with vibrant illumination. Let's get started!
Choosing the Right LEDs for Your RC Car
When I first started customizing my RC cars, I was overwhelmed by the sheer variety of LEDs available. I didn't know the difference between a 3mm and a 5mm LED, let alone which color would look best on my Baja buggy. I spent hours researching different types of LEDs, their voltage requirements, and their brightness levels. It was a steep learning curve, but ultimately, it was worth it.
The key to selecting the perfect LEDs is to consider the size of your RC car, the desired effect, and the available voltage. Smaller RC cars, like mini-crawlers, might benefit from compact 3mm LEDs, while larger vehicles can accommodate brighter 5mm or even surface-mount LEDs (SMDs). Don't underestimate the importance of resistors! LEDs require resistors to limit the current flowing through them, preventing them from burning out. The correct resistor value depends on the LED's forward voltage and the power supply voltage. Online calculators and datasheets are your best friends in determining the correct resistor value. Brightness also matters. Consider the environment you'll be driving in. Super-bright LEDs might be perfect for nighttime driving but could be overkill during the day. Experiment with different colors and placement to achieve the desired look. Warm white LEDs can mimic headlights, while vibrant colors like blue, green, or red can create a futuristic or aggressive aesthetic. Remember to check the voltage requirements of your LEDs and ensure they are compatible with your RC car's power source. Using the wrong voltage can damage the LEDs or even your RC car's electronics.
Understanding Basic Wiring for RC Car LEDs
Wiring can seem intimidating, but it's fundamentally about creating a complete circuit for the electricity to flow. At its core, you need a power source, an LED, a resistor (to protect the LED), and wires to connect them all. Think of it like a tiny electrical highway where electrons travel from the power source, through the resistor, into the LED (making it light up), and back to the power source. If the highway is broken at any point (a loose connection, a cut wire), the electricity can't flow, and the LED won't light up.
One of the most common mistakes beginners make is skipping the resistor. Without a resistor, the LED will draw too much current and quickly burn out. Resistors are small components marked with colored bands that indicate their resistance value (measured in ohms). You'll need to determine the correct resistor value based on your LED's forward voltage and the power source voltage.
Soldering is the most reliable way to connect wires and components. It creates a strong, permanent bond that won't easily come loose. However, if you're not comfortable soldering, you can use crimp connectors or wire nuts. Just make sure the connections are secure and won't vibrate loose during operation. Also, ensure that you are using the appropriate wires for the voltages that will be used on the RC car.
Insulating your connections is crucial to prevent short circuits. Heat shrink tubing is a great option for covering exposed wires and connections. Simply slide the tubing over the connection and apply heat (using a heat gun or lighter) to shrink it tightly around the wires. Electrical tape can also be used, but it's not as durable as heat shrink tubing. Proper wiring is essential for the longevity and reliability of your LED lighting system. Take your time, double-check your connections, and always prioritize safety.
The History and Evolution of RC Car Lighting
The history of RC car lighting is relatively short compared to the history of RC cars themselves. Early RC cars were primarily about functionality and performance, with aesthetics taking a backseat. Lighting was often an afterthought, if included at all. The initial lighting solutions were basic incandescent bulbs, which were inefficient, fragile, and didn't offer much in terms of customization.
The advent of LEDs revolutionized RC car lighting. LEDs are smaller, more durable, and far more energy-efficient than incandescent bulbs. They also offer a wide range of colors and brightness levels, allowing for unprecedented customization. Initially, LED installations were often crude, involving bulky batteries and exposed wires. As technology advanced, smaller and more integrated LED controllers and power sources became available, making it easier to create sophisticated lighting systems.
Today, RC car lighting is a sophisticated art form. Enthusiasts use programmable LED controllers to create dynamic lighting effects, such as strobing headlights, chasing taillights, and underglow that changes color with the car's speed. Some even incorporate sensors that trigger lighting effects based on the car's movements or surroundings. The advancements in 3D printing have also allowed for the creation of custom light housings and diffusers, further enhancing the aesthetics of RC car lighting.
While the core principles of wiring and electronics remain the same, the possibilities for RC car lighting continue to expand. From simple headlight replacements to complex, computer-controlled lighting systems, the only limit is your imagination and your budget.
Hidden Secrets to Making Your RC Car Lighting Shine
Beyond basic wiring and LED selection, there are a few hidden secrets that can elevate your RC car lighting from good to spectacular. One often-overlooked trick is using diffusers. Diffusers are materials that scatter the light, creating a softer, more even glow. They prevent the harsh, pinpoint appearance of LEDs and create a more professional-looking effect. You can use materials like frosted acrylic, tracing paper, or even cotton balls to diffuse the light.
Another secret is proper wire management. Messy wiring can detract from the overall appearance of your RC car and can also create electrical problems. Use zip ties, heat shrink tubing, and wire channels to keep your wiring neat and organized. This will not only improve the aesthetics but also make it easier to troubleshoot any issues that may arise. Consider the placement of your LEDs carefully. Experiment with different angles and positions to achieve the desired effect. Sometimes, a subtle change in placement can make a big difference in the overall look of your car.
Power distribution is another key consideration, especially if you're running multiple LEDs. Avoid overloading your RC car's receiver or battery by using a separate power distribution board. This will ensure that all of your LEDs receive adequate power and prevent damage to your RC car's electronics. Furthermore, proper grounding techniques are essential for preventing electrical noise and interference. Ensure that all of your grounds are properly connected to a common ground point on your RC car.
Finally, don't be afraid to experiment with different lighting effects. Programmable LED controllers allow you to create a wide range of dynamic lighting effects, such as strobing, fading, and chasing. Use these effects sparingly to create a unique and eye-catching look for your RC car. These "hidden secrets" can make a big difference in the overall appearance and performance of your RC car lighting system.
Recommendations for RC Car Lighting Kits and Components
For beginners, starting with a pre-made RC car lighting kit can be a great way to get your feet wet. These kits typically include everything you need to add basic lighting to your RC car, such as LEDs, resistors, wires, and a simple controller. They often come with detailed instructions, making the installation process straightforward. Popular brands like Yeah Racing, Integy, and RC Lights offer a variety of lighting kits for different types of RC cars.
If you're looking for more customization options, consider purchasing individual components and building your own lighting system. This allows you to choose the specific LEDs, resistors, and controllers that best suit your needs. Online retailers like Amazon, e Bay, and Ali Express offer a vast selection of RC car lighting components at competitive prices.
When choosing a lighting kit or components, pay attention to the voltage requirements. Ensure that the LEDs and controllers are compatible with your RC car's power source. Most RC cars use a 6V or 7.2V battery, so choose LEDs and controllers that are designed to operate within this voltage range. Consider the quality of the components. Cheap LEDs and controllers may be tempting, but they often lack durability and reliability. Invest in high-quality components from reputable brands to ensure long-lasting performance.
If you're planning to add a lot of LEDs to your RC car, consider using a separate power distribution board. This will prevent overloading your RC car's receiver or battery and ensure that all of your LEDs receive adequate power. Finally, don't forget about safety. Always use a resistor with each LED to prevent it from burning out. And always disconnect the power source before working on your RC car's electrical system. There are many kits to choose from, take your time and pick the kit or individual components that suits your needs.
Safety First:Essential Precautions When Working with RC Car Electronics
Working with electronics, even on a small scale like an RC car, requires careful attention to safety. Always disconnect the battery before making any modifications to the wiring. This will prevent accidental short circuits and potential damage to your RC car's electronics. Invest in a good multimeter. A multimeter is an essential tool for troubleshooting electrical problems. It can be used to measure voltage, current, and resistance, allowing you to diagnose issues quickly and easily.
Wear safety glasses when soldering or cutting wires. This will protect your eyes from flying debris and fumes. Use a well-ventilated area when soldering. Solder fumes can be harmful, so it's important to work in a well-ventilated area or use a fume extractor. Avoid touching exposed wires or components when the power is on. This can result in electric shock.
Be careful when working with lithium polymer (Li Po) batteries. Li Po batteries are powerful but can be dangerous if mishandled. Never puncture, crush, or short-circuit a Li Po battery. And always charge Li Po batteries with a Li Po-compatible charger. Use heat shrink tubing to insulate exposed wires and connections. This will prevent short circuits and protect the wires from damage. Double-check your wiring before connecting the battery. Make sure all connections are secure and that there are no exposed wires.
If you're not comfortable working with electronics, consider seeking help from a more experienced RC enthusiast. It's better to be safe than sorry. Above all else, safety should always be your top priority when working with RC car electronics.
Tips for Achieving Professional-Looking RC Car Lighting
Achieving a professional-looking RC car lighting setup involves more than just slapping on some LEDs. Attention to detail and a focus on quality are essential. Before you even start wiring, plan your lighting design. Sketch out where you want to place the LEDs and how you want them to be wired. This will help you visualize the final result and avoid mistakes.
Use high-quality wires and connectors. Cheap wires and connectors can be unreliable and can detract from the overall appearance of your RC car. Invest in high-quality components that are designed to withstand the rigors of RC car operation. Hide the wiring as much as possible. Exposed wires can ruin the look of your RC car. Use wire channels, zip ties, and heat shrink tubing to keep the wiring neat and organized.
Use diffusers to soften the light. Diffusers prevent the harsh, pinpoint appearance of LEDs and create a more professional-looking effect. You can use materials like frosted acrylic, tracing paper, or even cotton balls to diffuse the light. Consider using a programmable LED controller. Programmable LED controllers allow you to create dynamic lighting effects, such as strobing, fading, and chasing. These effects can add a touch of sophistication to your RC car lighting.
Take your time and be patient. Rushing the installation process can lead to mistakes and a less-than-professional result. Take your time to do the job right and you'll be rewarded with a stunning RC car lighting setup. And remember, practice makes perfect. The more you work with RC car lighting, the better you'll become. Don't be afraid to experiment and try new things.
Choosing the Right Resistors for Your LEDs
Choosing the correct resistor for your LEDs is crucial for ensuring their longevity and preventing them from burning out. The resistor limits the amount of current that flows through the LED, protecting it from damage. To calculate the correct resistor value, you'll need to know the LED's forward voltage, the desired current, and the power source voltage. The forward voltage is the voltage required for the LED to light up. The desired current is the amount of current you want to flow through the LED. And the power source voltage is the voltage of your RC car's battery or power supply.
The formula for calculating the resistor value is: R = (Vs - Vf) / I, where R is the resistance in ohms, Vs is the power source voltage, Vf is the forward voltage, and I is the desired current in amps. For example, let's say you have an LED with a forward voltage of 2V, a desired current of 20m A (0.02A), and a power source voltage of 5V. The resistor value would be: R = (5V - 2V) /
0.02A = 150 ohms.
It's always better to choose a resistor with a slightly higher value than the calculated value. This will ensure that the LED doesn't draw too much current. You can find resistor value calculators online that will help you determine the correct resistor value for your LEDs. Be sure to use a resistor with an appropriate power rating. The power rating is the amount of power the resistor can dissipate without overheating. A resistor with a higher power rating is always better. You can calculate the power rating of the resistor using the formula: P = I^2 R, where P is the power in watts, I is the current in amps, and R is the resistance in ohms. By taking the time to choose the right resistor for your LEDs, you can ensure that they will last for years to come.
Fun Facts About RC Car Lighting
Did you know that the first RC cars didn't have any lights at all? They were purely functional, designed for speed and performance. The addition of lights was a later development, driven by the desire to enhance the realism and aesthetics of RC cars. The brightest LED in the world can produce over 1 million lumens! While you probably wouldn't want to use such a bright LED on your RC car, it's a testament to the incredible advancements in LED technology.
Some RC car enthusiasts use fiber optics to create intricate lighting effects. Fiber optics are thin strands of glass or plastic that transmit light over long distances. They can be used to create glowing outlines, illuminated dashboards, and other unique lighting features. Programmable LED controllers can be used to create a wide range of dynamic lighting effects, such as strobing, fading, and chasing. Some controllers even allow you to synchronize the lighting with the car's speed or sound effects.
The most popular colors for RC car lighting are blue, green, and red. These colors are vibrant and eye-catching, and they can be used to create a variety of different looks. Some RC car enthusiasts use UV (ultraviolet) LEDs to create a glowing effect. UV LEDs emit ultraviolet light, which causes certain materials to fluoresce, creating a glowing effect.
The world record for the longest RC car jump is over 300 feet! Imagine how cool it would look to see an RC car soaring through the air with its lights blazing. These fun facts showcase the creativity and innovation that exists within the RC car community. From basic headlight replacements to complex, computer-controlled lighting systems, the possibilities for RC car lighting are endless.
How to Power Your RC Car Lights: Battery Options and Wiring
Choosing the right power source for your RC car lights is essential for ensuring their brightness and longevity. The most common options are using the RC car's existing battery, using a separate battery pack, or using a voltage regulator. Tapping into the RC car's existing battery is the simplest option, but it can drain the battery faster and potentially interfere with the car's performance. If you choose this option, be sure to use a voltage regulator to ensure that the LEDs receive the correct voltage.
Using a separate battery pack is a more reliable option, as it won't affect the RC car's performance. You can use a small Li Po battery pack or a set of AA or AAA batteries. Be sure to choose a battery pack with a voltage that is compatible with your LEDs. A voltage regulator is a device that regulates the voltage to a constant level. This is important for LEDs, as they are sensitive to voltage fluctuations. A voltage regulator will ensure that the LEDs receive the correct voltage, regardless of the battery's charge level.
When wiring your RC car lights, be sure to use the correct gauge of wire. The gauge of wire determines how much current it can safely carry. For most RC car lighting applications, 22-gauge wire is sufficient. Use heat shrink tubing to insulate all connections. This will prevent short circuits and protect the wires from damage. Connect the positive wire from the battery to the positive terminal of the LED, and the negative wire from the battery to the negative terminal of the LED. Be sure to use a resistor in series with each LED to prevent it from burning out. By following these guidelines, you can ensure that your RC car lights are powered safely and reliably.
What If My RC Car Lights Don't Work? Troubleshooting Tips
There are a few common reasons why your RC car lights might not be working. Start by checking the battery. Make sure it's fully charged and properly connected. A dead or poorly connected battery is the simplest and most common cause of lighting problems. Next, inspect the wiring for any loose connections, broken wires, or short circuits. A visual inspection can often reveal the culprit.
Test the LEDs themselves. LEDs can burn out over time. Use a multimeter to check if the LEDs are still functioning. If an LED is burned out, it will need to be replaced. Verify the resistor values. Using the wrong resistor value can prevent the LEDs from lighting up or cause them to burn out prematurely. Double-check your resistor values using an online calculator or a resistor color code chart.
Check the voltage. Make sure the voltage reaching the LEDs is within the specified range. Use a multimeter to measure the voltage at the LED terminals. Test the polarity. LEDs are polarity-sensitive, meaning they only work when connected in the correct direction. If the LED is connected backward, it won't light up. Reverse the polarity and try again. If you're using a programmable LED controller, make sure it's properly programmed. The controller may be set to a mode where the lights are turned off or dimmed. Consult the controller's manual for programming instructions. By systematically troubleshooting each of these potential issues, you can usually identify and fix the problem with your RC car lights.
Top 5 LED Lighting Ideas for Your RC Car: A Listicle
Ready to take your RC car lighting to the next level? Here are five creative ideas to inspire your next build:
1.Underglow: Mount LEDs along the chassis to create a cool underglow effect. Choose a color that complements your RC car's paint job.
2.Headlights and Taillights: Replace the stock headlights and taillights with brighter LEDs. Consider using LEDs with different colors or brightness levels for a more realistic look.
3.Wheel Well Lighting: Mount LEDs inside the wheel wells to illuminate the wheels and tires. This is a great way to add a touch of flair to your RC car's appearance.
4.Interior Lighting: Add LEDs to the interior of your RC car to illuminate the dashboard and seats. This is a great way to enhance the realism of your RC car.
5.Strobe Lights: Use a programmable LED controller to create strobe light effects. This is a great way to add a touch of excitement to your RC car's appearance.
These ideas can be adapted and customized to fit your individual preferences and the style of your RC car. Consider combining multiple ideas for a truly unique and eye-catching lighting setup. The possibilities are endless!
Question and Answer About How to Customize RC Cars with LED Lighting
Here are some common questions about customizing RC cars with LED lighting:
Q: What tools do I need to customize my RC car with LED lighting?
A: You'll need a soldering iron, solder, wire strippers, wire cutters, a multimeter, heat shrink tubing, and a heat gun or lighter.
Q: How do I choose the right LEDs for my RC car?
A: Consider the size of your RC car, the desired effect, and the available voltage. Smaller RC cars might benefit from compact 3mm LEDs, while larger vehicles can accommodate brighter 5mm or even surface-mount LEDs (SMDs).
Q: How do I calculate the correct resistor value for my LEDs?
A: Use the formula: R = (Vs - Vf) / I, where R is the resistance in ohms, Vs is the power source voltage, Vf is the forward voltage, and I is the desired current in amps.
Q: What are some safety precautions I should take when working with RC car electronics?
A: Always disconnect the battery before making any modifications to the wiring. Wear safety glasses when soldering or cutting wires. Use a well-ventilated area when soldering. And avoid touching exposed wires or components when the power is on.
Conclusion of How to Customize RC Cars with LED Lighting
Adding LED lighting to your RC car is a fantastic way to personalize your ride and make it stand out from the crowd. With the right tools, knowledge, and a little bit of creativity, you can transform your RC car into a stunning, light-blazing machine. Remember to prioritize safety, plan your design carefully, and don't be afraid to experiment. Whether you choose a pre-made lighting kit or build your own custom system, the possibilities are endless. So, grab your LEDs, fire up your soldering iron, and get ready to illuminate your RC car!